Powered By Blogger

Monday, March 9, 2026

Cozy Sweater Bears 2nd grade

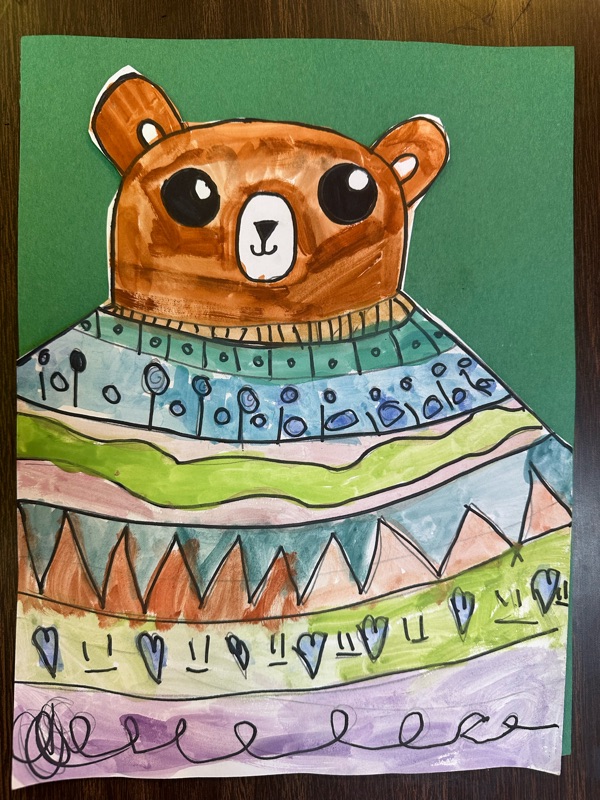
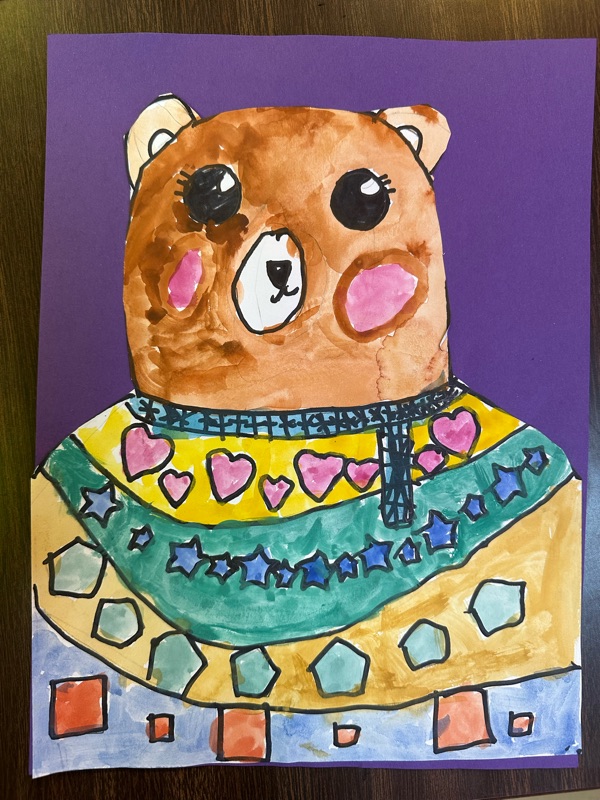
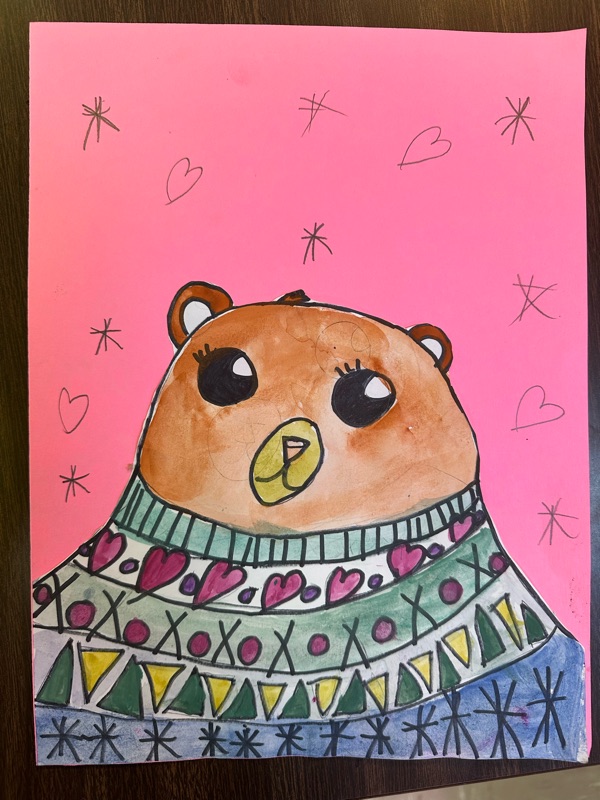
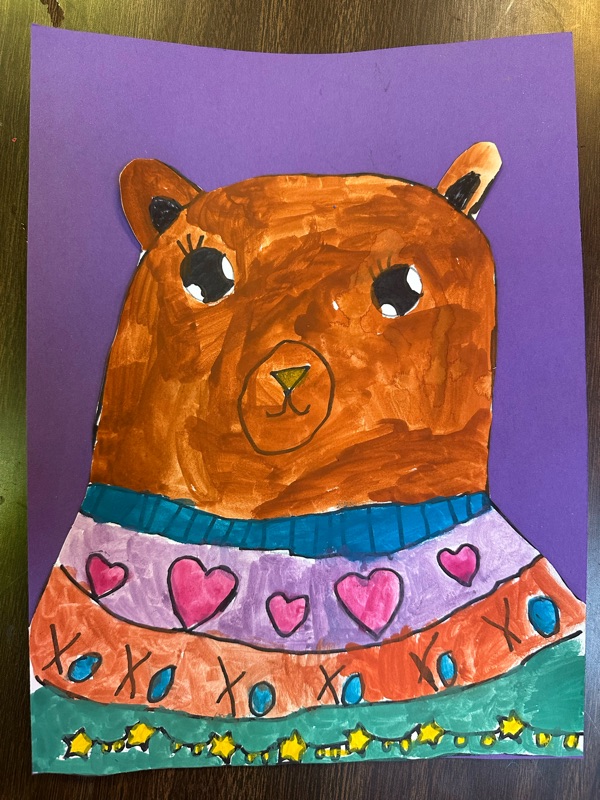
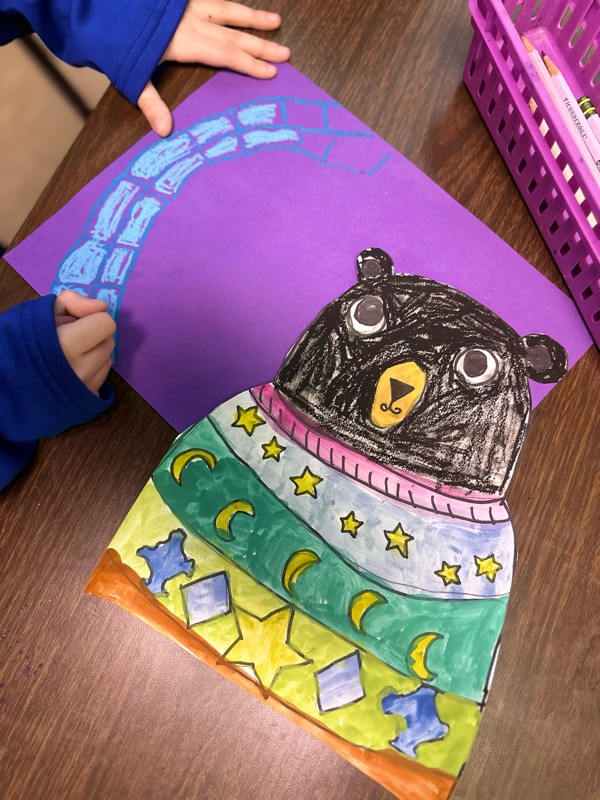
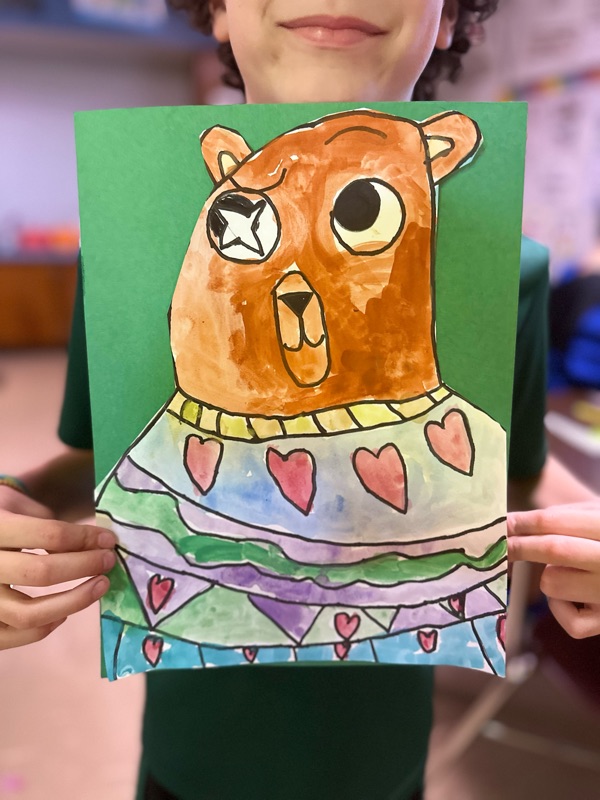
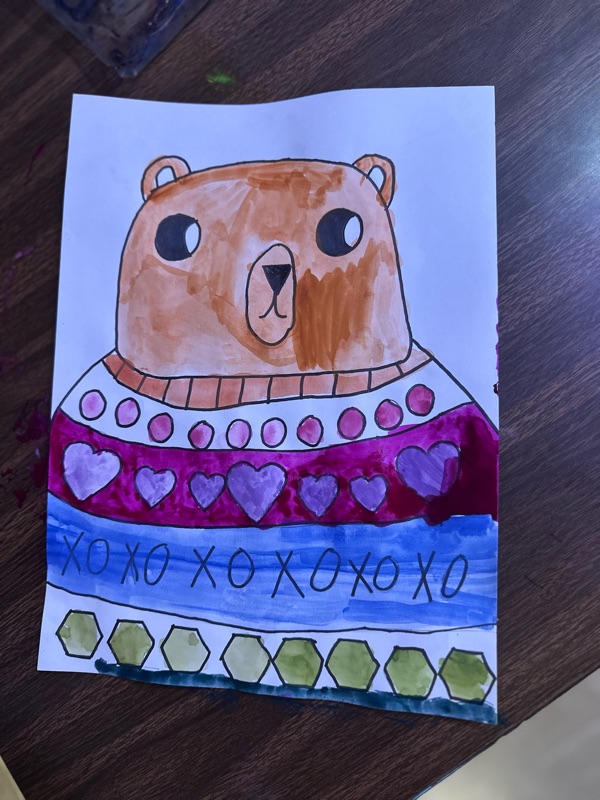
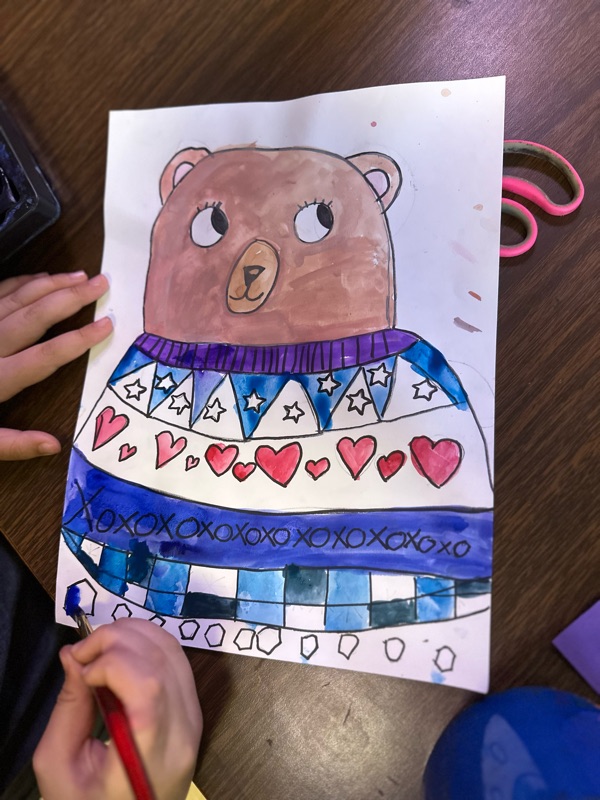
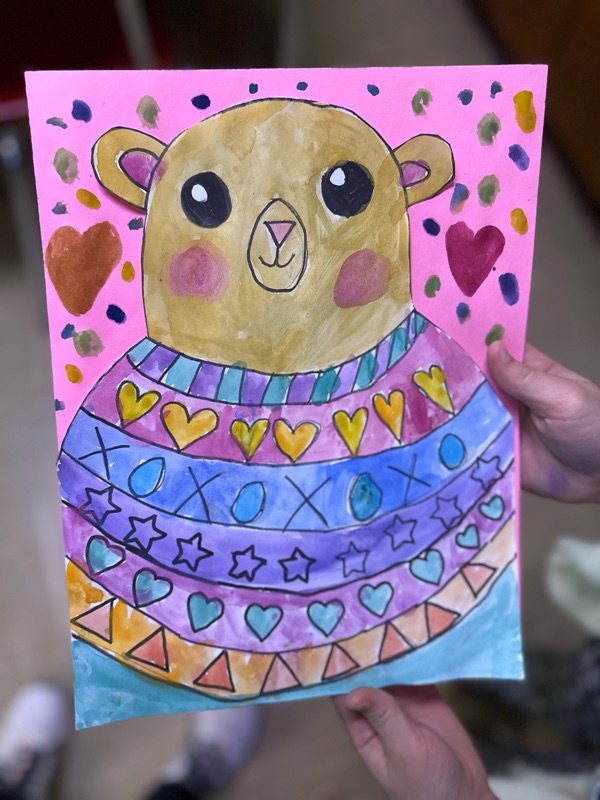
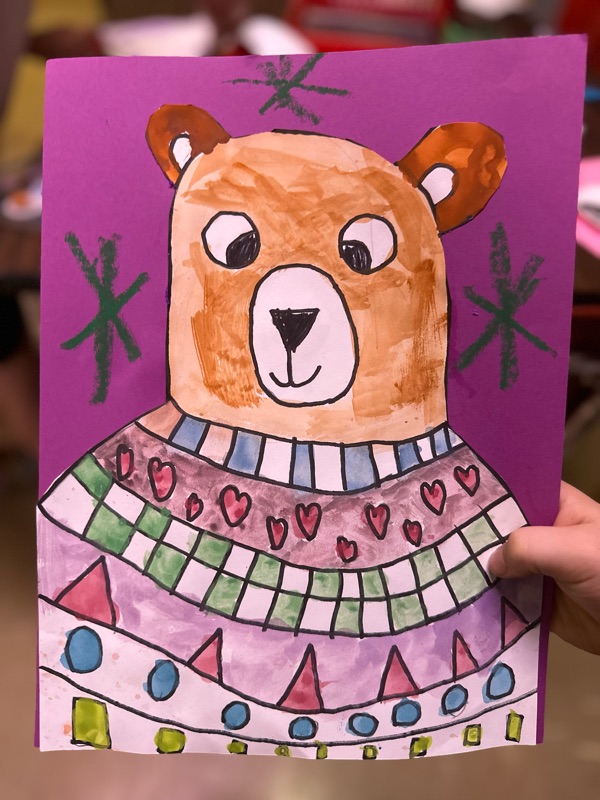
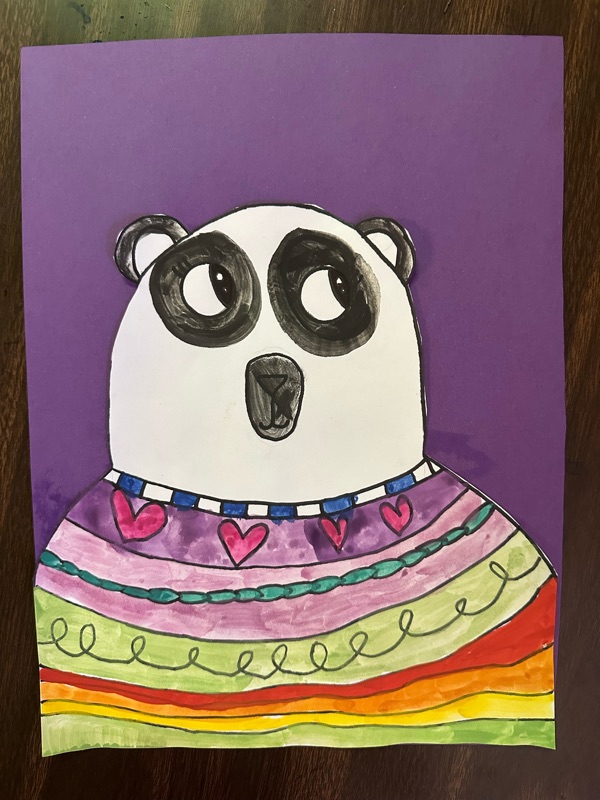
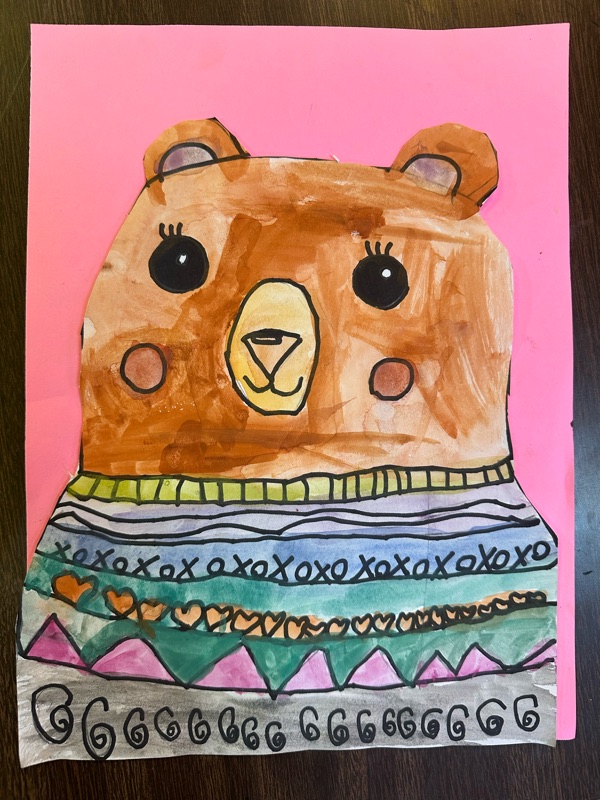
This week in the art room 2nd grade created these adorable Pattern Bears in Sweaters, from PrimaryPicassos on Instagram, and the students absolutely loved it! This project was a great way to combine drawing, pattern design, and watercolor painting while practicing careful craftsmanship.

Step 1: Drawing the Bear
Students began by lightly sketching their bear with pencil. We focused on simple shapes—circles and ovals—to build the bear’s head and ears. Then we added the cozy oversized sweater that fills most of the page. The sweater was divided into several horizontal sections so students could create a different pattern in each area.

Step 2: Pattern Design
Next came the fun part—patterns! Each section of the sweater was filled with a repeating design. We talked about how patterns repeat and how artists can vary shapes to make their work more interesting. Students used hearts, stars, X’s and O’s, triangles, dots, and more to create unique sweater designs.

Step 3: Tracing with Sharpie
Once the drawings were complete, students carefully traced their pencil lines with Sharpie. This step helps the artwork stand out and keeps the lines strong when we add paint.

Step 4: Watercolor Painting
Finally, we brought our bears to life with watercolor paint! Students practiced controlling the amount of water on their brush while filling in their patterns and backgrounds with bright colors. The watercolor gives the sweaters a soft, cozy look.

What We Practiced

  • Drawing with simple shapes

  • Creating repeating patterns

  • Careful outlining with marker

  • Watercolor painting techniques

  • Craftsmanship and creativity

Every bear turned out completely unique, and the patterned sweaters made them extra fun to look at. It’s always exciting to see how students take the same idea and turn it into their own creative masterpiece!

Art is sweeter when we learn, experiment, and create together. 🐻✨


Finger Weaving!


This week in art, our students explored finger weaving—a simple and exciting way to create colorful woven chains using just yarn and their hands! This hands-on activity helps students learn about patterns, coordination, and creativity while having fun with bright colors.

What Is Finger Weaving?

Finger weaving is a basic weaving technique where students use their fingers instead of tools or looms to weave yarn together. By looping and crossing strands of yarn, students can create long, colorful woven chains. Each chain becomes a unique piece of fiber art!

Students chose several colors of yarn and worked step-by-step to weave them together. As they practiced the pattern, they discovered how different color combinations created beautiful designs.

Skills We Practiced

While working on this project, students developed several important skills:

  • Fine motor skills through manipulating the yarn

  • Pattern recognition as they repeated the weaving sequence

  • Color planning by choosing yarn combinations

  • Patience and focus while building long woven chains

Many students were excited to see how long their woven chains could grow!

Watch the Instructions

If you'd like to try finger weaving at home, you can follow the same steps we used in class. Watch the video below for a demonstration of the weaving process:


Why We Love Fiber Art

Fiber art projects like finger weaving allow students to experience a different kind of artmaking. Instead of drawing or painting, they are building artwork with fibers and patterns. It’s a wonderful way to combine creativity with hands-on problem solving.

We can’t wait to see how students continue exploring weaving and other fiber art techniques throughout the year!


Ask your young artist about the colors they chose and how long their woven chain became!

Weaving on a cardboard loom!

This week, 5th graders is exploring the world of fiber art by learning how to weave on a cardboard loom! This project introduces students to one of the oldest art techniques in the world while helping them practice patience, creativity, and craftsmanship.

What Is a Loom?

A loom is a tool used to hold yarn or thread in place while another piece of yarn is woven through it. For this project, students created their own simple looms using 6" × 13.5" pieces of cardboard. Small notches along the edges hold the vertical yarn strands, called the warp.

Once the warp yarn is in place, students begin weaving a second strand of yarn, called the weft, back and forth across the loom.

How Students Are Weaving

Students are creating their weaving on one side of the cardboard loom. They weave the yarn over and under the warp strings, switching the pattern on each row. As they continue this pattern, the yarn begins to build into a colorful woven design.

Students can:

  • Choose different yarn colors

  • Create patterns or stripes

  • Experiment with texture and spacing

Each weaving becomes a unique work of art!

Here's how we made ours! Stay tuned for part II! 


Skills We’re Practicing

This project helps students develop several important artistic and learning skills:

  • Fine motor skills through careful weaving

  • Pattern recognition with the over–under sequence

  • Creative decision making when choosing colors and designs

  • Patience and focus as the weaving slowly grows

Weaving is a process that takes time, but students love watching their artwork grow row by row.

A Tradition of Fiber Art

Weaving has been used by cultures around the world for thousands of years to create textiles, clothing, and decorative art. By learning this technique, students are connecting to a long tradition of artists who work with fiber.

We are excited to see the beautiful patterns and colorful designs our young artists create!


Ask your student about the colors they chose and the patterns they are weaving into their artwork!